To create a new Account, type a new Account name into the field on the right side of the Create Account button and click that button.
The selected Account name should meet the Domain Object name restrictions.
Use the pop-up menu to specify the Account type:
- MultiMailbox
- A folder-type Account that can contain several Mailboxes of various types, as well as File Storage.
The INBOX Mailbox is automatically created within the new Account.
All incoming E-mails are stored in the INBOX Mailbox by default.
The user can create additional Mailboxes using any IMAP client or AirSync client
software, or using the CommuniGate Pro Web E-mail Interface.
- A-Grade, B-Grade, ...
- Same as MultiMailbox, but depending on the license type some addtional Services may be available to the Account.
By default, the Account name becomes the person's E-mail name, so Account
names should contain only letters, digits, dash and point (dot) symbol - some
mail systems cannot send mail to E-mail addresses containing other
symbols.
Click the Create Account button. When a new Account is created, its name appears in the Domain Objects list.
The Server automatically displays the Settings page for the new Account.
The Settings of a newly created Account are automatically set to the
Account Template values.
You can create several Accounts at once, by preparing an Account List
file and using the Import option.
If you have the Domain Administrator (not the Server Administrator) access rights,
you need to be granted the CanCreateAccounts access right.
To specify Account Settings, click the Account name link in the Accounts
list. The Account Settings page appears.
- Real Name
- This field is used to specify the real-life user name. The Server
uses this information to compose the default 'From' address in Web Mailer.
- additional System fields
- If the Server Directory Integration settings contain some
System Custom Account Setting fields, these fields appear in this panel where they can be set and modified.
- CommuniGate Password
- The Account password. When authenticating a user, the Server can check either this
password or OS password, or both (see below).
- additional Public Info fields
- If the Server Directory Integration settings contain some
Public Info Custom Account Setting fields, these fields appear in this panel where they can be set and modified.
The modified values of the Real Name and additional fields are updated in the Directory
if the Domain has the Directory Integration setting set to
Keep In Sync.
After the Account Settings are modified, click the Update button.
Use the Authentication panel to specify the Account authentication methods.
To log into the CommuniGate Pro Account, a user (a client application) supplies a password, directly, or via
some secure authentication protocol. For successful authentication:
- the supplied password should match the CommuniGate Password stored in the Account settings (see above), or
- the supplied password should match the password of the "mapped" Server OS account (see below), or
- the supplied password should be verified using Authentication URI (see below), or
- the supplied password should be verified using an External Authenticator program.
Besides the password-based authentication methods, CommuniGate Pro Server can authenticate its Account users
using other methods, such as Kerberos and TLS Certificates.
See the Security section for the details.
- CommuniGate Password
- CommuniGate Pro Account internal password can be stored as an Account setting (see above).
The following settings control how this internal CommuniGate password is used.
- CommuniGate Password
- This setting tells the Server if it should compare the user-provided password and the internal CommuniGate Password.
- Password Modification
- This setting controls if the user can modify the CommuniGate Password via the
PWD module, the WebUser Interface, XMPP module, or the XIMSS Interface.
- Password Complexity
- This setting specifies how complex the user-supplied CommuniGate Password should be.
- any
- no restriction
- mixed case letters
- the password must contain both upper-case and lower-case letters
- letters and digits
- the password must contain both upper-case and lower-case letters, and at least one decimal digit.
- special
- the password complexity is verified by passwordcomplexity.scgp Synchronous Script with customizeable code.
- Password Encryption
- This setting specifies how the Server should store the CommuniGate Password.
If the clear option is selected, the password is stored as a clear-text string.
All other options specify various encryption methods. In most cases, you will not specify
this setting on a per-account basis, but rather using the Domain Account Defaults or global
Account Defaults.
The U-crpt password encryption is used for compatibility with the Unix "crypt" encryption
method and it should be used for migrating users from other servers only. The U-crtp-encrypted passwords can
not be used for Secure (SASL) Authentication methods.
See the Security section for the details.
- Ask to change Password every
- This setting specifies how often the Server will ask the user to change the password.
User will be asked to change the password on login to the Account via WebUser Interface or Samoware client.
- on Next Login
- This option forces the Server to ask the user to change the password on next login to the Account via WebUser Interface or Samoware client.
- Alt RADIUS Password, Alt SIP Password
- These alternative passwords (if set) are used for RADIUS and SIP authentication operations.
Note: when you set new values for these options, they are stored using the current Password Encryption method.
Note: These settings can be used only when the CommuniGate Password option is enabled.
- Password Recovery
- This setting controls if the user can use the WebUser Interface
or the XIMSS Interface to ask the Server to send the CommuniGate Password to the "recovery E-mail" address.
- Server OS Integration
- CommuniGate Pro Accounts can be "mapped" onto the accounts (registered users) of the Server OS.
When a CommuniGate Pro user is being authenticated using a Server OS password,
or when a separate process (program) should be launched on the user behalf, the CommuniGate Pro
Server constructs an OS username (OS account name) to be used for that CommuniGate Pro user (Account).
- OS UserName
- This setting specifies how to compose the Server OS username. The asterisk (*)
symbol is substituted with the CommuniGate Pro Account name. If this setting contains just
one symbol - the asterisk symbol, then the CommuniGate Pro Account is "mapped" onto the OS account
with the same name: when the CommuniGate Pro Server checks the OS password for the Account
jmsith, it checks if the specified password can be used to
log into the OS account jsmith.
If the setting contains *.dj, the OS username for the CommuniGate Pro Account
jsmith is jsmith.dj - and the jsmith.dj name is used for all
OS-level operations initiated on behalf of the CommuniGate Pro Account jsmith.
- OS Password
- If this option is enabled, the Account user can log in using the password set in the
Server OS registration information for this user.
- Other Login Methods
- CommuniGate Pro Accounts users can use other methods to log into their Accounts.
- Authentication URI
- An External Resource can be used for authentication.
The URI (Uniform Resource Identifier) is of the form schema://address[:port]/parameters
Currently only the ldap and ldaps schemas are supported.
See the Security section for the details.
- Kerberos Login
- If this option is enabled, the user can log into the Account using the Kerberos Authentication method.
See the Security section for the details.
- Certificate Login
- If this option is enabled, the user can log into the Account using the Client Certificate Authentication method.
See the PKI section for the details.
- External Password
- If this option is enabled, the user can log into the Account using a password verified with the External Authenticator program.
See the Security section for the details.
- Cache External Password
- An externally verified password is cached for the specified period.
If the period is set to 0 seconds, then the server uses the External Authenticator or External Resource each time a password needs to be verified.
Secure Only
This option requires use of secure authentication methods
(APOP or non-clear-text SASL methods) with this Account.
If a user client application connects to the Server and supplies a
password for this Account using an insecure ("clear text") authentication
method, the Server will reject the connection even if the supplied password is correct.
Clear-Text password are still accepted if they are passed through a secure (SSL/TLS) communication channel.
If the option is set to Require TLS then the login is possible only through connections secured with SSL/TLS.
Note: Since OS passwords can be checked only using the clear-text authentication
method, enabling the Secure Only option forces the users employing OS passwords to use
secure (SSL/TLS) communication channels.
Detailed Logging
If this option is enabled, access protocol operations (POP, IMAP, ACAP, LDAP, etc.) and mailbox operations for this Account are recorded in the System Log using the All Info Log Level.
Log Login/Logout
If this option is enabled, login/logout operations for this Account are recorded in the special Supplementary Log.
Failed Login Limit
This setting specifies a time period and the number of incorrect login attempts that a user or
users can make before the Account is disabled for login operations. Account logins are re-enabled after the same period of time.
The Server remembers the IP Address of the client that performed the last successful login.
Logins from this IP Address are not blocked even when the number of incorrect login attempts exceeds the limit.
Last Failed Login
This element is displayed when there was a failed attempt to log into this Account. The element displays the
attempt date and/or time, and the IP address the attempt was made from.
Click the Clear button to remove the Last Failed Login info and to reset the Account Failed Logins counter.
If the CommuniGate Password, OS Password, Kerberos, Certificate, and External Authentication
options are disabled, the user will not be able to access the Account.
Any Authentication setting can be set to the default value, in this
case the setting value is taken from the Domain Default Account Settings or the
Server-wide or Cluster-wide Default Account Settings.
CommuniGate Pro supports customizable set of methods of verification that password authentication is performed by a user who possess something that can be contacted separately from the primary authentication channel: for example a mobile phone ready to receive an SMS, a land-line phone ready to receive a call, an e-mail address on another mail system, and so on. Having verified the account's primary password, CommuniGate Pro uses the x2auth.scgp Synchronous script to deliver to the user an one-time password using either of these additional methods. By default the following methods are available: an e-mail message to the e-mail address, defined for the Forgotten Password Recovery; an SMS or a phone call to the number, defined in the Alternative Contact in the Account Settings. The set of the available methods is determined by the strings.x2auth.data file of the Basic Skin Text Dataset. The user then has to enter that one-time password to confirm the possession of the items used for this additional authentication.
This additional authentication is supported for logins through the WebUser Interface or the XIMSS protocol. After a successful login the additional verification can be not requested for the logins from the same IP address for the specified period of time.
CommuniGate Pro supports several named variants for built-in password settings. These are convenient to use with multiple client applications or multiple devices:
each application or device can be assigned a specific tagged password, which can be changed or removed without affecting accessibility via remaing clients or devices.
To use a tagged password its tag (label) should be specified after the account name and the $ symbol. If the full account name (with the domain part) is used, then the $ symbol follows the local part of that name just before the @ symbol:
- Example:
-
| user$tag | for authenticating as user and the password under the label tag |
| usr$dev@domain | for authenticating as usr@domain and the password under the label dev |
There is a set of settings that specify which CommuniGate Pro services can be used with the Account:
- Mail
- If this Service is disabled, incoming E-mail Messages are not delivered to this Account.
Incoming messages are suspended in the Local Delivery Module queue, and they
are rejected if this option is not re-enabled within the specified period of time.
See the Local Delivery module settings for the details.
If this option is disabled, Account cannot compose and submit E-mail Messages.
- Relay
- If this Service is disabled, Account user is not able to use the Mobile Users Support features.
You may want to disable this Service when you provide free WebMail Accounts, and you do not want spammers to use
these Accounts to enable SMTP relaying.
- Signal
- If this Service is disabled, incoming Signals sent to this Account are rejected.
- Roaming
- If this Service is disabled, the Account user cannot connect (login) from Internet Addresses not
included into the Client Addresses list.
You may want to disable this Service if you want your users to connect to their Accounts
only from the Internet Addresses on your own network.
- TLS
- If this Service is disabled, secure (SSL/TLS) access to this Account is disabled.
- POP, IMAP, MAPI, AirSync, PWD, XMPP, FTP
- If a protocol Service is disabled, the Account cannot be opened (the Account user cannot be authenticated) using that protocol.
- SIP
- If this Service is disabled, SIP operations requiring authentication (REGISTER, outgoing calls, etc.) are not available for this Account.
- WebMail
- If this Service is disabled, the Account cannot be opened using the WebUser Interface.
- XIMSS
- If this Service is disabled, the Account cannot be opened using the XIMSS Interface.
- Agent
- If this Service is disabled, the Account cannot be assigned an Agent role in Contact Center.
- SMIME
- If this Service is disabled, Secure Mail (S/MIME) features implemented in the WebUser and XIMSS Interfaces are not available for this Account.
- LDAP
- If this Service is disabled, the Account user cannot be authenticated with the LDAP module.
- RADIUS
- If this Service is disabled, the Account user cannot be authenticated with the RADIUS module.
- WebCal
- If this Service is disabled, the Account user cannot use the Calendaring functions of the WebUser and XIMSS Interfaces,
and the user cannot be authenticated using the CalDAV protocol.
- WebSite
- If this Service is disabled, HTTP and WebDAV access to this Account is disabled.
- PBX
- If this Service is disabled, the Account cannot use the PBX services.
- HTTP
- If this Service is disabled, sessions and real-time applications created for this Account cannot use outgoing HTTP transactions.
The Server checks the Account and the Account Domain settings.
Only if the Service is enabled for both the Account and the Account Domain, that service can be used with this Account.
See the Domains Settings section for more details.
If you select the default option, the Enabled Services for this Account are
defined using Domain Default Account Settings or the Server-wide/Cluster-wide Default Account Settings.
Note: please note a difference between the Default Account settings and the Enabled Services specified
for the Domain: while you can override the Default Account Settings for some Account by
explicitly specifying the enabled Services for that Account, you cannot override the Enabled Services
specified for the Domain. If the Default Account Settings disable POP and IMAP access, you
can explicitly enable POP and IMAP access for a particular account. But if POP and IMAP access
is disabled with the Domain Settings, no Account in that Domain can be accessed via these protocols.
- Session Limits
- These settings limit the number of concurrent sessions accessing this Account.
If the number of the already opened sessions exceeds the specified limit, a new login operation is rejected with an error code being sent to the client application.
- POP Login Limit
- This setting limits the frequency of POP Logins into this Account. If the number of POP logins exceeds the specified
limit, the session is rejected with an error code being sent to the mail client. The user should change the POP client settings to make it check mail less often.
Open the Mail Settings page in the Mail section of the Account Settings:
- Mail Storage Limit
- This option is used to specify the maximum total size of the all Account Mailboxes.
If a new incoming message cannot be stored in an Account, because the Account size would exceed the specified limit,
the message is rejected and the message sender receives an error report.
The current Mail Storage usage value is shown as a button, if the page is viewed by
a System Administrator. By clicking this button you can re-calculate the usage storage counter
if that counter was de-synchronized.
- Mailbox Limit
- This option is used to specify the maximum number of Mailboxes that can be
created in this Account.
- Archive Messages after, Delete Messages after
- See the Chronos section for the details.
- New Mailbox Format
- This setting specifies the default format for all new Mailboxes created in this Account.
- Non-Mail Folders visible via IMAP
- This setting controls if IMAP clients see non-Mail (Calendar, Contacts, etc.) Mailboxes.
See the IMAP module section for more details.
- Zap Deleted Messages
- When this option is selected, the messages being deleted from the Account Mailboxes are rewritten with garbage first.
- Encrypted Mailbox Creation
- This setting specifies if the Account user is allowed to create Encrypted Mailboxes.
- Incoming Message Size Limit
- This option is used to specify the maximum size of an E-mail Message that can be delivered to the Account.
- Incoming Mail Limit
- This option is used to limit the number of E-mail Messages an Account can receive over the specified period of time.
See the Local Delivery Module section for more details.
- Delay New Mail
- If the Account mail storage size is limited, and the specified percent
of that limit is already used, or it would be used when the new message is added,
message delivery to this Account is suspended. The Local Delivery module
settings specify what actually happens to the Account message queue in this case.
- Send Alerts
- This option specifies when the Storage Quota Alerts
should be sent to the Account user.
The Alert message text is a Server String
and it can be customized.
- Send Notice
- This option specifies when the Local Delivery module should compose and store an "over quota"
message in the Account INBOX. If this Notice Message is stored, no new Notice Message will be composed
and stored for the next 24 hours.
The Notice Message Subject and the Message text are Server Strings
and they can be customized. There are two different Notice Message bodies - one is used when an incoming message has been
delivered, and the other one - when an incoming message is too big to be delivered to the Account.
Note: the Notice Messages are not submitted to the Queue, they are composed
with the Local Delivery module and they are stored directly in the Account INBOX.
To disable these 3 options, set their values to 101%.
- Allowed Mail Rules
- This setting tells the Server if the user is allowed to specify automated
Rules that instruct the Server how to process incoming E-mail messages.
- No
- If this option is selected, only the administrator can specify the automated rules for this user.
- Filter Only
- If this option is selected, the user can specify only the following actions:
Discard, Reject, Stop Processing, Mark, Add Header, Tag Subject, Store in, Copy Attachments to, and Store Encrypted in.
- All But Exec
- If this option is selected, the user can specify any action, but the Execute and Execute URL actions.
- Any
- If this option is selected, the user can specify any action.
Click the Mail Rules link to specify the
rules to be applied to all incoming E-mail messages directed to this Account.
If an administrator creates an Automated Rule containing actions the
Account user is not allowed to specify, the user will be able to view that Rule,
but not to modify any part of it.
- Remote Poll Modifications
- This setting tells the Server if the user is allowed to specify remote host
(RPOP and RIMAP) accounts that the Remote Poll module should poll on the user's behalf.
If this option is disabled, only the administrator can specify the remote account records for this user.
Click the Remote Poll link to specify the remote accounts to be polled on behalf of this user.
- Accept Mail to all
- This setting tells the Server to store messages directed to the all@domain address in the Account INBOX.
- Outgoing Mail Limit
- This option is used to limit the number of E-mail Messages composed and submitted on behalf of this Account, over the specified period of time.
If the number of messages submitted during the specified period of time exceeds the specified limit, the Account user's ability to submit messages is suspended (for the specified period of time).
-
- Outgoing Message Size Limit
- This option is used to specify the maximum size of an E-mail Message that can be composed and submitted by this Account.
- Outgoing Recipients Limit
- This option is used to limit the number of recipients to whom E-mail Messages can be submitted on behalf of this Account, over the specified period of time.
If the number of recipients submitted during the specified period of time exceeds the limit, the user's ability to submit messages is suspended.
-
- Max Recipients per Message
- This option is used to specify the maximum number of recipients in a single E-mail Message that can be submitted by this Account.
- 'From' Address Restrictions
- This option is used to specify what e-mail address can be used in From: header in messages submitted by this Account.
- None
- If this option is selected, any address can be used, including a non-existent one.
- Strict
- If this option is selected, only the Account name can be used as the address.
- Relaxed
- If this option is selected, the following can be used:
- 'From' Name Restrictions
- This option is used to specify what title can be used in From: header in messages submitted by this Account.
- None
- If this option is selected, any name can be used.
- Strict
- If this option is selected, the following can be used:
- the exact value of Real Name attribute of this Account, if the 'From' address is routed to the Account.
- the exact value of Real Name of a Group, if the 'From' address is routed to that Group and this Account is the member of the Group.
- the exact value of Real Name attribute of another Account, if the 'From' address is routed to that Account,
and if this Account has CanImpersonate Domain access right,
or if that Account had granted this Account the Delegate Account access right.
- Relaxed
- If this option is selected, the following can be used:
- an empty string.
- any string containing the value of Real Name attribute of this Account, if the 'From' address is routed to the Account.
- any string containing the value of Real Name of a Group, if the 'From' address is routed to that Group and this Account is the member of the Group.
- any string containing the value of Real Name attribute of another Account, if the 'From' address is routed to that Account,
and if this Account has CanImpersonate Domain access right,
or if that Account had granted this Account the Delegate Account access right.
These options are used to prevent system abuse by the system own users, and for mitigation of damage from compromised Accounts used by hackers.
These limits and restrictions are applied to the messages submitted from authenticated sources: via SMTP using the AUTH operation,
via the WebUser Interface and XIMSS clients, via the MAPI module, via the POP module XTND XMIT command,
via AirSync clients, etc.
Note: some of users can send messages via SMTP without using the AUTH operation,
because they send from the network addresses specified in the Client IP Addresses list,
or because they use the Read-then-Send method. In this case the messages
they submit cannot be attributed to any Account and those messages are not counted, and their From: headers are not checked.
If you want to apply the Outgoing Flow Control settings to all messages submitted by your users,
you should force all of them to use the SMTP AUTH operation by enabling the Force SMTP AUTH option in
the Domain Settings.
Note: the messages generated by Account-level or Domain-wide Rule action, including ones generated by the Copy All Mail To simplified Rule,
are also fall under the restrictions. So when the restrictions are on, the user may be able to use only the "Send on behalf of this Account" (Forward to) action,
but not Redirect to and Mirror to actions which preserve the original From: header.
- Add Mail Trailer
- This setting tells the Server to append the trailer text (specified in the
Domain Settings) to all messages this user composes
using the WebUser Interface.
- Reroute External Recipients to
- This setting specifies how the addresses of the external message recipients are changed.
If the setting value is * or empty string then the recipients are unchanged. Otherwise the * symbol is replaced with
the original recipient address and the Router restarts trying to route this new address.
- Sample:
- The Domain Reroute External Recipients to option is set to
*@smarthost.com._via
The outgoing messages from users of this domain will be sent to intended recipients through the smarthost.com server.
- Sample:
- The Account Reroute External Recipients to option is set to
error
The user will be able to send only locally within the Server, attempts to send to outside will cause an error.
Note: This rerouting is applied only to external addresses (directed to SMTP Module), not applied to local addresses.
Any of these Settings can be set to the default value, in this
case the setting value is taken from the Domain Default Account Settings or the
server-wide/cluster-wide Default Account Settings.
Open the Call Settings page in the Real-Time section of the Account Settings:
- Allowed Call Rules
- This setting tells the Server if the user is allowed to specify automated
Rules that instruct the Server how to process incoming Signals.
- No
- If this option is selected, only the administrator can specify the automated Signal Rules for this user.
- Any
- If this option is selected, the user can specify any action.
Click the Call Rules link to specify the
rules to be applied to all incoming Signals (calls) directed to this Account.
If an administrator creates an Automated Rule containing actions the
Account user is not allowed to specify, the user will be able to view that Rule,
but not to modify any part of it.
- Concurrent Calls
- This setting specifies the maximum number of concurrent calls this Account can be involved in (as a caller or a callee).
Note: if the Call Info option is disabled, the number of concurrent calls cannot be defined and it cannot be limited.
- Call Logs
- If this option is enabled, the Signal component places call log records into the private/logs/ files in the Account File Storage.
- Call Info
- If this option is enabled, the Signal component stores the current calls information in the Account data, from where it can be retrieved
using the dialog Signal package, and other methods.
Disable this option if the Account is a service one, handling many concurrent calls, and there is no need to retrieve the current call information.
- Incoming Calls Limit
- This setting specifies the maximum number of incoming calls this Account can receive over the specified period of time.
- Outgoing Calls Limit
- This setting specifies the maximum number of outgoing calls this Account can make over the specified period of time.
- Registered Devices
- This setting specifies the maximum number of "Contacts" (devices) the Server can register for this Account.
The Used field shows the number of the currently registered devices.
- RSIP modifications
- This setting specifies if the Account user is allowed to modify the Account RSIP settings.
The Used field shows the current number of the Account RSIP records.
- Roster Limit
- This setting specifies the maximum number of Roster elements ("Buddies") for this Account.
- Send IMs to SIP Devices
- If this option is set to Enabled, incoming Instant Messages are delivered to all registered SIP devices;
if this option is set to If Supported, incoming Instant Messages are delivered only to those registered SIP devices that declared support for the MESSAGE SIP Method;
if this option is set to Disabled, incoming Instant Messages are not delivered to registered SIP devices.
- IM Logs
- If this option is enabled, incoming and outgoing Instant Messages are stored in the Account File Storage.
- Outgoing NOTIFY Requests Limit
- This setting specifies the maximum number of NOTIFY requests (such as presence updates, call dialog status updates, etc.) this Account can send over the specified period of time.
Increase this setting as you increase the allowed Roster Limit: when the Account changes its presence state, a NOTIFY request with the new presence info is sent to each Roster item (to each "buddy").
- Map Call Dialog Status to Presence
- If this option is enabled, and this Account has active calls, then the Account presence state is set to "on-phone".
The Instant Messages processing is also controlled with Account Preferences.
Open the File Settings page in the Files section of the Account Settings:
- File Storage Limit
- This option is used to specify the maximum total size of the all files in the
Account File Storage. If this option is set to zero, the Account File Storage is disabled.
- File Size Limit
- This option is used to specify the maximum size of a file that can be stored in the Account File Storage.
- Files Limit
- This option is used to specify the maximum number of all files in the Account File Storage.
- Add Banner to HTML
- This setting tells the Server to insert the Web banner code (specified in the
Domain Settings) to all HTML files retrieved from this
Account File Storage.
- Default Web Page
- When an HTTP URL for a File Storage file does not specify a file name
(http://domain:port/~account/ or http://domain:port/~account/subDir/),
a file with the Default Web Page name is retrieved.
Open the Account Settings page to modify the WebUser Interface settings:
- Hidden Skins
- This option is used to specify the names of the WebUser Interface (and Samoware) Skins that should be
hidden from this Account user. If several names are specified, separate them with the comma (,) symbol. To hide the "unnamed" Skin,
specify the unnamed name.
- Hidden Languages
- This option is used to specify the names of the languages (by the names of the Language Files) that should be
hidden from this Account user. If several names are specified, separate them with the comma (,) symbol.
- Hidden Samoware Modules
- This option is used to specify the names of the Samoware modules that should not be loaded for this Account user.
If several names are specified, separate them with the comma (,) symbol.
The following module names are recognized: IM, Contacts, Mail, History, Dialer, Files, Calendar, Tasks, Prefs, Notes, Chats
- Banner Parameters
- This setting value is passed to the External Banner System when it is requested to generate an advertising banner for this Account session.
Each Account can have Aliases (alternative names).
If the john_smith Account has the jsmith and j.smith Aliases,
E-mail directed to jsmith and to j.smith will be stored in the john_smith Account,
and the Signals directed to to jsmith and to j.smith will be delivered to the john_smith Account.
To access the john_smith Account via POP, IMAP, XMPP, XIMSS, WebUser, or any other client application
both the user names jsmith and j.smith can be specified in the client application settings.
You can modify existing Aliases, you can add an Alias by typing
a new name in the empty field, and you can remove an Alias by deleting it
from its field. Use the Update button to update the Account Aliases list.
Alias names should not be the same as the name of some other Account, or other Object in the same Domain.
The Alias names should meet the Domain Object name restrictions.
You can specify several Aliases in one field by separating them with the comma (,) symbol.
Each Account can have zero, one, or more Telephone (PSTN) numbers assigned to it.
The Server maintains a global list of all Telephone Numbers assigned to all Accounts in all Domains.
Telephone numbers should be specified in the E.164 format: +country_code area_code local_number.
The number should contain only digits and it can start with the plus (+) symbol.
Note:
- Only when a Signal (a call) comes to your CommuniGate Pro
Server or Cluster, these Telephone Number mappings take effect.
- An assigned Telephone Number should be registered with one of the PSTN Gateways. When a
PSTN call is made to that number, the Gateway should receive the call and it should direct
the call to your CommuniGate Pro Server via a VoIP protocol (such as SIP).
When a call made to a PSTN number arrives to the Server, it is usually still directed to the
dialed PSTN number, and not to the user Account name. The Server uses its global list of
assigned Telephone Numbers to route the call to the proper Account.
- Users may want to register their assigned Telephone Numbers with one of the global ENUM services.
If a Telephone number is linked to a CommuniGate Pro Domain using such a service, VoIP calls made
by users of all VoIP systems employing that ENUM service will be routed to the CommuniGate Pro
Account directly, via the Internet, bypassing PSTN.
To manage the Account Telephone Numbers, open the WebAdmin Account Management pages, then open the Call Settings page in the Real-Time section:
You can modify existing Telephone Numbers, you can add a Telephone Number by typing
a new name in the empty field, and you can remove a Telephone Number by deleting it
from its field. Use the Update button to update the Telephone Numbers list.
See the PSTN section for more details.
The CommuniGate Pro Server maintains an Access Control List (ACL) for every Account.
The Access Control Lists are used to control what other users can do with this Account.
A Server Administrator with the All Domains access right has
all access rights to all Server or Cluster Accounts.
The Account owner can grant certain limited access rights to other users, controlled with
a Access Control List.
The following Account access rights are supported:
- c (CreateMailbox)
- If you grant a user the CreateMailbox access right, that user will be able to create
Mailboxes on the "top" of your Account (i.e. Mailboxes that are not sub-Mailboxes of existing
Mailboxes in your Account).
- x (Delegate)
- If you grant a user the Delegate access right, that user will be able to subscribe to
the Account Event packages, access all folders of the Account and create calendar events on the Account behalf.
- j (CallControl)
- If you grant a user the CallControl access right, that user will be able to access the
information about your real-time communications.
This information includes the data about Signal objects handling
your incoming calls, and it can be used to intercept your incoming calls ("call pick-up").
The Account Access Control Lists can be set and modified using
the WebUser Interface, a XIMSS,
or a MAPI client.
If you want to rename an Account, open its Settings page, and enter a new Account name into the New Account Name field.
Click the Rename Account button.
If there is no other Object with the same name as the specified new
Account name, the Account is renamed and its Account Settings page should
reappear on the screen under the new name.
You cannot rename an Account when it is in use.
If you are a Domain Administrator, you should have the Can Create Accounts
Access Right to rename Accounts in your Domain.
You can move an Account into a different Domain, if you specify the new Account name as newName@domainName.
If you are a Domain Administrator, you should have the Can Create Accounts
Access Right for both Domains.
If you want to remove an Account, open its Settings page, and click the Remove Account button. The confirmation page should appear.
If you confirm the action, the selected Account, all its Mailboxes,
Settings, and other Account-related data files will be permanently removed
from the Server disks.
The Account Aliases and all Mailing List owned by this Account will be removed, too.
You cannot remove an Account when it is in use.
If you are a Domain Administrator, you should have the Can Create Accounts
Access Right to remove Accounts from your Domain.
An Account setting can have the default value. In this case the actual setting value
is taken from the Default Account Settings for the Account Domain.
You can modify the Default Account Setting values by clicking the Account Defaults link on any Domain administration page of the WebAdmin Interface.
The Default Account Settings page resembles a regular Account Settings page.
The Domain Default Account Settings themselves can be assigned the default value.
In this case the setting value is retrieved from the Server-wide or Cluster-wide Default Account Settings.
You can modify the server-wide Default Account Settings by clicking the Account Defaults
link on the Domains (Domain List) page.
A Dynamic Cluster installation maintains separate
server-wide Default Account Settings for all Accounts in non-Shared (Local) Domains, and cluster-wide
Default Account Settings for all Accounts in the Shared Domains. In the Cluster environment, the
Default Account Settings page displays links that allow you to switch between the Server-wide
and Cluster-wide Default Settings.
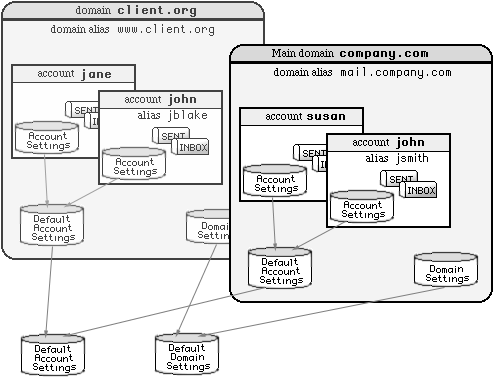
Example: -
| The global (Server) | Default Account Settings: | Storage Limit = 10Mbytes |
| The company.dom | Default Account Settings: | Storage Limit = 30Mbytes |
| The client1.dom | Default Account Settings: | Storage Limit = default |
Now:
- If you create an Account in any Domain, and set its Storage Limit to some value, that
value will be used.
- If you create an Account in the company.dom Domain, and set its Storage Limit value to default,
the Account will be able to keep up to 30Mbytes of mail (the Default Account Setting for that Domain).
- If you create an Account in the client1.dom Domain, and set its Storage Limit value to default,
the Account will be able to keep up to 10Mbytes of mail (the global Default Account Setting for the Server).
When you serve many Accounts, you should try to specify most of the setting values as
default, so you can easily change those settings for all Accounts. If some Account
should be treated differently, you should explicitly specify the required setting value for that Account.
A Class of Service is an additional named Default Account Settings set. You can have several sets within
each Domain, and you can specify a set to use for each Account, so Accounts in the same Domain can have different Default Settings.
To create a new Class of Service, use the WebAdmin Interface to open the Account Defaults page (a Domain one, a Server-wide, or a Cluster-wide one).
If you are a Server Administrator, or a Domain Administrators with the ServiceClasses Access Right,
you can create additional Classes of Service:
Enter the new Class of Service name and click the Create Class of Service button. A new Class of Service will be created.
The Account Defaults page lists all created Classes of Service:
To open the Class of Service settings, click its name. The Class of Service settings page is the same as the Account Defaults page.
Account Defaults can be viewed as an unnamed Class of Service.
If you are a Server Administrator, or a Domain Administrators with the ServiceClasses Access Right,
you can rename or remove Classes of Service. Use the WebAdmin Interface to open the Class of Service page, and scroll to the bottom of the page:
When there is at least one Class of Service created on the Domain or Server/Cluster level, the Account Settings page includes the Class of Service setting.
If you are a Server Administrator, or a Domain Administrators with the ServiceClass Access Right,
you can modify this setting:
When an Account Class of Service setting is not empty, the following algorithm is used to retrieve an Account settings:
- If the Account has a setting value explicitly assigned, that value is used.
- If the Domain has a Class of Service with the specified name, and that Class of Service settings contain a setting value, that value is used.
- If the Server-wide (a Cluster-wide for Accounts in shared Domains) has a Class of Service with the specified name, and that Class of Service settings contain a setting value, that value is used.
- Finally, the Server-wide (a Cluster-wide for Accounts in shared Domains) Account Default settings are used to retrieve the setting value.
You can create a Domain Class of Service with the same name as a Server-wide (or Cluster-wide) Class of Service to override some of its settings.
When you need to create many Accounts, you may want to specify some non-default
setting for all new Accounts. Each Domain has its own Account Template, and you
can modify it by clicking the Template link on the Account List page.
The Accounts Template page resembles a regular Account Settings page.
All the settings set there will be copied to all newly created Accounts in this Domain.
Note: The Default Account Settings and Account Template are quite different.
The Account Template is used only when an Account is being created. All template settings
with non-default values are copied to the new Account settings. If you modify the
template settings after an Account has been created, those Account settings will not change.
Besides the initial, non-Default setting values, the Account Template can be used
to instruct the Server to create additional Mailboxes in each new Account (by default only
the INBOX Mailbox is created), to subscribe the Account to certain Mailboxes, and
to create Mailbox Aliases in all newly created Accounts.
Enter a name into the empty field to add a Mailbox name to the list.
For non-mail Mailboxes, specify the Mailbox Class from the pop-up menu.
If you select the Lock checkbox, it will be impossible to delete or rename the created Mailbox.
In this sample, when a new multi-mailbox Account is created in this Domain, the
mail Mailboxes Sent and Drafts, and the calendar Mailbox Calendar will be created in that Account,
along with the INBOX Mailbox.
The Account users will not be able to delete or rename the Calendar Mailbox.
See the Mailboxes section to learn about Mailbox Subscriptions.
Creating initial non-empty subscription:
- simplifies the initial set-up of some client mailers that can access only those Account Mailboxes
that are included into the Mailbox Subscription list;
- helps new users to subscribe to public Mailboxes containing administrative information, news, etc.
See the Mailboxes section to learn about Mailbox Aliases.
Specifying a non-empty list of Mailbox Aliases simplifies the initial set-up for
Microsoft Outlook users that need access to public Mailbox and other
Foreign Mailboxes, but cannot use their mailers to access
foreign Mailboxes directly.
This field can contain a mail message in the RFC822 format. If this field is not empty,
then the specified message is stored in the INBOX Mailbox of every newly created Account.
The text can contain the following macro combinations, replaced with the newly created Account data:
- ^A - the newly created Account name.
- ^D - the Domain name.
- ^E - the newly created Account Real Name.
The Date: header field is automatically added to the stored messages.
The message text can start with a [charsetName] prefix, then the text will be converted from UTF-8
to the specified character set. Specify the Content-Type header field with the proper the charset= parameter:
Templates can be used to generate an initial default Web (HTML) page in the
File Storage for all newly created Accounts:
This field can contain an HTML text. If this field is not empty,
then the specified text is stored as the Default Web Page file
in the File Storage of each newly created Account.
The built-in Account Loader allows the administrator to register sets of
users. The user names and Account attributes should be placed into a tab-delimited
text file on the administrator (client) computer, and that file should be uploaded
to the server using the Import field.
Click the browse button to select a file on your local system, and then click the
Import Accounts button to create Accounts listed in the selected file.
Below is a sample IMPORT file:
| Name | Ignore | Storage | Aliases |
| johnd | sales dept | 50M | |
| susan | mgmnt | 10M | susan.s,susan_smith |
| sales | dummy | 30M | |
| info | dummy | 50M | help |
Note: The import file must be prepared on the client computer (on the computer you
use to run your browser). The browser allows you to upload files from disks connected to that
computer, not to the CommuniGate Pro Server computer.
Note: When using Netscape and some other Unix browsers, make sure that the file name ends
with the .txt suffix - otherwise the browser won't upload the file as a text one, and the file will be ignored.
Note: The MacOS 9.x versions of the Microsoft Internet Explorer upload
Macintosh files in the encoded x-macbinary format if the file contains a resource fork.
Most text files created with Macintosh text editor applications contain resource forks that
keep the information about the file fonts, file window position, and other Macintosh data. Such
files cannot be used as import files with the Microsoft Internet Explorer browser. Either
use a text editor application that saves text files without resource forks or use a browser
that uploads Macintosh files without encoding.
The first file line describes the file contents. It should contain tab-delimited names
of Account attributes. The following names are supported:
- Name
- This column contains the Account names. This attribute is not
required to be in the first column, but it must exist. All other attributes are optional.
- RealName
- This column contains the Account user "real name".
- Password
- This column contains the Account password.
If the file does not contain this column, or this field is empty, the CommuniGate Password
and the Use CommuniGate Password settings are taken from the Domain Account Template.
- UnixPassword
- This column can be used instead of the Password column.
If it exists, it should contain crypt-encrypted Account passwords.
The Account Loader will add the binary prefix to those strings,
so these CommuniGate passwords will be used as U-crpt encrypted passwords.
See the Migration section for more details.
- ChangePassword
- If this column value is Yes string then the user will be asked to change the password on next login to the Account via WebUser Interface or Samoware client.
- Storage
- This column contains the maximum Account Mail Storage size (in bytes, or in kilobytes, if the number is
followed with K, or in megabytes, if the number is followed with M). The column data can contain
-1 or unlimited to specify unlimited storage.
- Aliases
- This column contains the Account Aliases; to specify several Aliases, separate them with the comma symbol.
- Telnums
- This column contains the Account Telnums; to specify several Telnums, separate them with the comma symbol.
- MailInRules
- This column contains the Account Mail Processing Rules. Rules should be represented in the
internal format, as an array of individual Rules. Each Rule is an array,
where the first element is the Rule priority, the second element is the Rule Name string,
the third element is the Rule conditions array, and the last element is the Rule Actions array.
- SignalInRules
- This column contains the Account Signal Processing Rules.
- Ignore
- This column is ignored. An Account list file can contain several Ignore columns.
- setting name
- You can use columns that contain initial values for various additional Account settings
(File Storage file and size limit, type or Rule actions enabled, etc.). Any additional column should have the
same name as the selected Account setting name (keyword).
For example, you can use the column named
MaxWebSize to specify the storage limit for the Account File Storage, and you can also
use the column named MaxAccountSize instead of the Storage column.
- Custom Setting
- You can use columns that contain initial values for various Custom Account Settings.
For example, if the Directory Integration page contains the Custom Setting city,
you can include a column named city in your Account Import file.
If the first line is parsed, all other lines are processed. Each line should contain tab-delimited fields,
with the field contents specified in the first line. A line can contain less fields than the first line,
in this case missing fields are processed as empty fields.
Attribute values for empty and missing fields are taken from the Account Template.
If an error occurs while processing some file line (missing name field, duplicate name, etc.),
all Accounts created while processing previous lines are removed, and the number of the line that
caused the problem is displayed. You can fix the file and try again.
|
